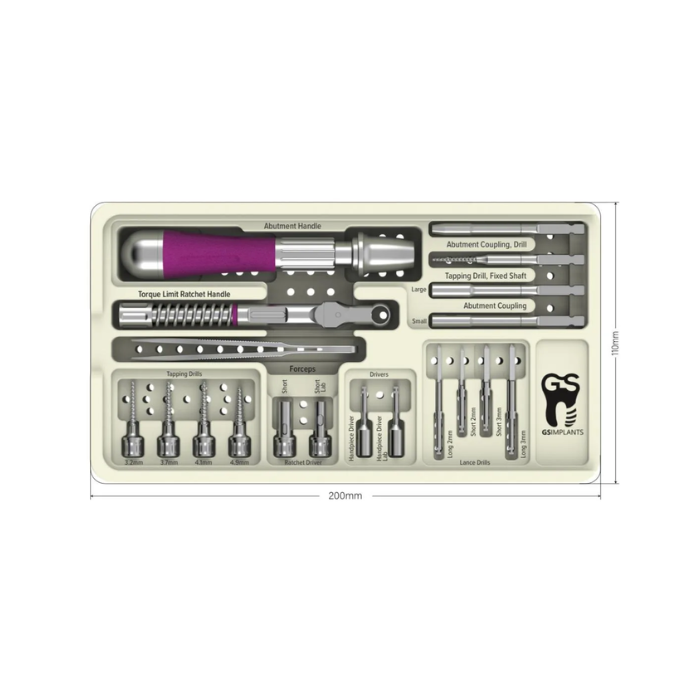
GS Implants Smart Kit
The GS Implants Smart Kit is a compact, lightweight, and precision-driven implant surgical kit engineered for accurate and minimally invasive implant placement. Designed to optimize clinical workflow, it supports a wide range of surgical techniques and ensures procedural confidence with superior tactile control and ergonomic design.
Features:
-
Optimizes clinical workflow and saves chair time
-
Maximum corrosion resistance for long-term use
-
Unique drill sharpness ensures minimal invasiveness and enhanced apex stability
-
Easily attachable and detachable components for seamless handling
-
Supports various implant placement techniques
-
Enables precise osteotomy with minimal heat generation
-
Provides enhanced tactile feedback for safe and accurate drilling
-
Ergonomic, logically organized layout simplifies intraoperative steps
-
Durable premium materials maintain performance over time
-
Suitable for single or multiple implant cases
-
Compact and ideal for portable or in-clinic procedures
| Technical Specification |
Lance Drills :
Tapping Drills :
|
|---|
- 1 x Abutment handle
- 1 x Torque limit ratchet handle
- 1 x Forceps
- 1 x Ratchet driver (Short)
- 1 x Ratchet driver (Short Lab)
- 1 x Handpiece Driver (Short)
- 1 x Handpiece Driver (Short Lab)
- 1 x Abutment Coupling Drill
- 1 x Abutment Coupling (Small)
- 1 x Abutment Coupling (Large)
- 1 x Fixed Shaft Tapping Drill
- 1 x Instrument Tray
- 4 x Lance Drills (Short 2mm, Short 3mm, Long 2mm, Long 3mm)
- 4 x Tapping Drills (Short 3.2mm, Short 3.7mm, Short 4.2mm, Short 4.9mm)
-
Flap or Flapless Access: Decide on the approach (flap or transgingival). If flap, make an incision along the alveolar ridge.
-
Initial Drilling: Start with a 2.0 mm (yellow) or 2.5 mm (black) pilot drill at 20,000–40,000 RPM using a 1:1 surgical handpiece. Drill until reaching desired osteotomy depth.
-
Purchase Point Formation: Ensure a solid entry point is created to anchor the implant and avoid lateral drift.
-
Implant Insertion: Mount the implant on the hand driver and rotate clockwise until resistance is felt.
-
Ratchet Final Seating: Switch to ratchet driver (long/short) for complete seating of the implant.
-
Hard Bone Cases: Use the tapping drill manually or with a handpiece to prepare a full-length thread in dense bone.
-
Final Placement: Insert the implant fully, ensuring the drill and implant axis aligns with the bone’s natural direction.
-
Parallelism Adjustment: Use the GS Handle or Ratchet to align implant heads. For cosmetic corrections, use a carbide bur followed by diamond and polishing stone.
-
Enhances clinical efficiency with an intuitive instrument layout
-
Promotes safe and guided osteotomy preparation
-
Reduces the risk of implant misalignment or heat-induced bone damage
-
Improves primary stability through precision-guided drilling
-
Facilitates both flap and flapless surgical approaches
-
Ideal for use in hard bone scenarios using tapping protocols
-
Supports parallel implant alignment and adjustment post-placement
-
Offers procedural flexibility across various surgical contexts


